Search This Blog

Thursday, April 26, 2012

A Break from the Kitchen: Shoya Izakaya

Avoid the temptation to hit this just to see if it works.
by Mango and Panda

Mango:

Wednesday evening was a pretty long day at work for the both of us, and we really weren't in the mood to cook. Panda offered to make some stew with leftover frozen brisket. I offered to take Panda for dinner instead. Because even endangered species need a break from the kitchen. Since we were in the mood for something stew-y or soup-y, we went to Shoya Izakaya. Quite possibly, the best Japanese restaurant in Atlanta. And the best part is that it's just 10 minutes away from us. It's very unassuming on the outside - it sits in an almost-empty strip mall near H-mart, so after we eat we usually waddle over to H-mart to get Korean fare or just walk around (Panda really loves walking around in grocery stores and markets). On the inside, Shoya is so cozy. Wood paneling, simple layout.


And the food is just as simple. Clean, crisp and pure so that you can really taste and appreciate the core ingredients. With most Indian food - there's an explosion of flavor (no doubt), but the main ingredients, be it fish, pork or chicken, can sometimes get lost in it all. There's actually a pretty neat article about this by Sanjeev Kapoor, an Indian chef I grew up watching on Khana Khazana (Zee TV shout out to my Indian peeps! haha). Check out the article if you have the chance.

Anyhooo, when at Shoya, I always order the marinated salmon. It's buttery melt-in-your mouth salmon sashimi that's rolled around julienned cucumber, marinated in olive oil (not sesame, although there's something else in there that I can't put my finger on) and other magical ingredients. It's served with seaweed and other types of sea-fare and veggies that I can't always identify. Amazing every time.


As my main dish, I ordered the nabeyaki udon, which is fish broth served in a hot pot with tempura shrimp, scallion, greens, mushrooms, fried bean curd, fish cakes, and my favorite, FAVORITE part: a poached egg.


SO GOOD. Panda, you concur?

Panda:

Yes, I concur.  Poached eggs make anything better.  Much like bacon.  Adding both bacon and a poached egg to anything is like cheating.

I was pretty hungry, having worked out a little earlier.  Moreover, I was seriously thirsty.  A Kirin Ichiban quenched my thirst quite nicely, and really does go well with Japanese fare.  A little trivia - A kirin is a mythological Japanese creature, also known as a dragon horse.  I don't know what that has to do with beer... maybe if you drink enough of it you see one.

Check out the cool cup the Kirin came in.  All of their dishes and cups are  really cool.
I also noticed a special of grilled tako, and whenever I see tako available I always get it.  Tako is Japanese for "octopus".  I know some of you may think that octopus sounds gross, but, if you've ever had calamari (squid) and enjoyed it, I'm positive you would love octopus.  Octopus is like squid, but meatier, almost steaky in texture, with a pleasant flavor. Get out of your comfort zone and give it a try.


For my main course, I got the tonkatsu ramen.  Tonkatsu broth is made from pork bones, typically the bones from trotters.  Unlike European style stocks, tonkatsu broth is made by splitting the bones and boiling them at a higher temperature.  The marrow in the bones melts into the stock, becoming part of it.  The result is a rich, creamy broth with a ton of flavor.  I plan on trying to make some soon.  While I will say that I think Raku in Duluth may have better tonkatsu, Shoya's is a very, very close second.

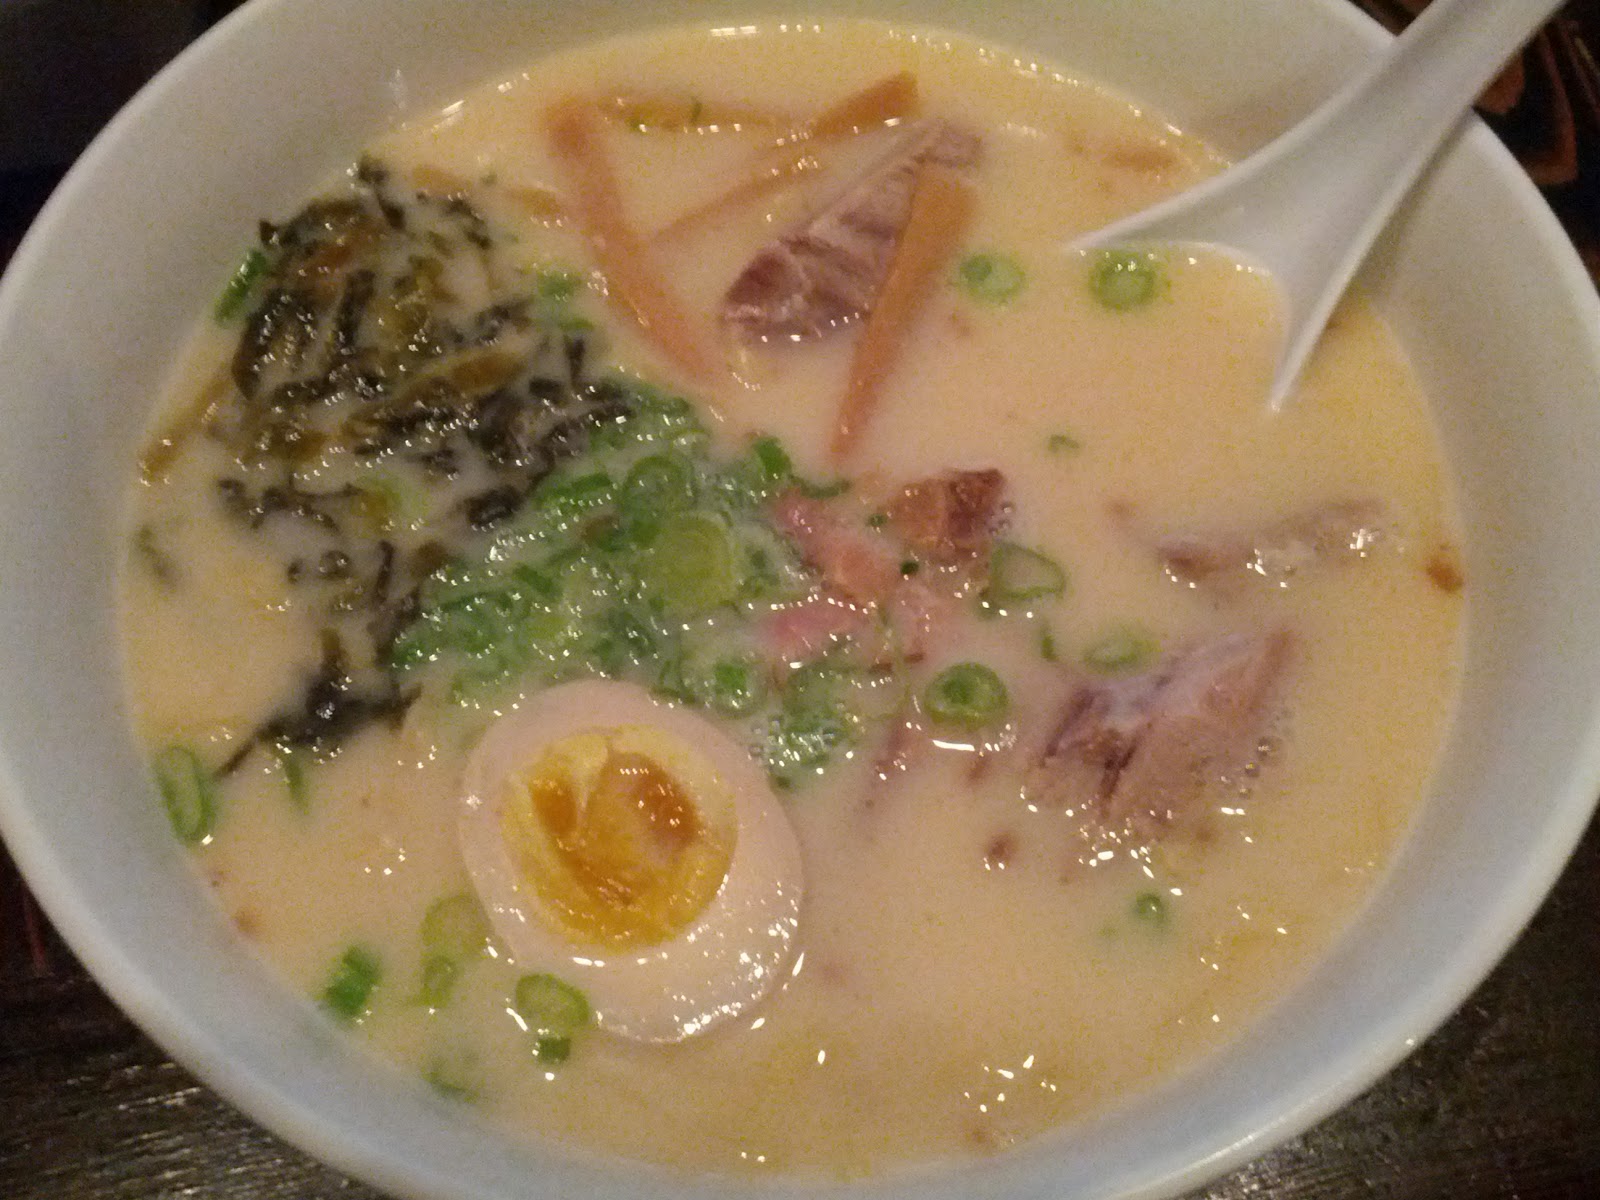
Tonkatsu ramen with roast pork, soy marinated egg, and other goodies .  The broth  is creamy looking; you'd think they put milk in it, but that's just from pork bones.
A panda with a full belly is a very happy Panda.  Thank you Mango. :)

Mango: Why are eggs so delicious?
Panda: I know, right?  Pretty tasty for something that comes out of a chicken's butt.

Tuesday, April 24, 2012

Off the Cuff: Cocoa and Chile Rubbed Braised Brisket

by Panda

Last week, Mango and I picked up a 3lb brisket from DeKalb Farmer's Market to use for making burgers with.  We found ourselves without dinner options one night, so I portioned out 1lb of the brisket to make us dinner with.

We'll often buy meat and other ingredients to make meals with, with no set plans as to what to do with them.  Not only do I find it fun to improvise, but I also think being able to put something together with what you have on hand is a useful skill; you don't always have everything readily available for making a specific dish with.  And, as a bonus, you may just come up with a new recipe that you'd enjoy making again.  Typically when I throw stuff together I choose ingredients for a reason... I almost always try to include something sweet, something tangy, and something earthy (umami), and also usually something aromatic.  These flavors may come in different proportions depending on what I'm going for, but they're usually in there in some way or another.


I thought that it would be nice to do a coffee rub, as I had spoken with a friend of mine the other night about it.  Coffee and red meat marry well together.  However, after digging around in our cabinets, I wasn't able to find anything that I thought would work well with it.  Then I spotted some cocoa nibs.


I don't remember what I bought these for - I think to brew cocoa tea with? - but they weren't doing anything sitting there in our cabinet, and I thought they would be a great replacement for coffee in my rub.


Into my spice grinder went the cocoa nibs, along with some cinnamon and peppercorns.  I then added this to my mortar and pestal, along with chopped garlic, salt, olive oil, chipotle pepper, and a tiny bit of honey.


I opened the brisket up with my knife, first cutting width-wise into the meat (with the grain) through the top 1/3 of the thickness of the meat, and then again through the last 2/3 of the meat to make one thin, wide piece of meat.  I took my rub and rubbed it all over the inside and outside of the meat, then rolled it back up (basically into its original shape).  The meat went into my hot cast iron pan to sear on all sides.

I didn't have any string to tie it up with, so I just kept it together with tongs while it seared.
Now for the braise.  I decided to use onions as a base, so I sliced one up and threw it into the pan, letting the onions break down and caramelize.  Now what could I use for liquid?  No beef stock handy, and no red wine... but look at what I found.

Don't freak out.  I know this is a good beer.  I only used some of it.  I drank the rest :D
Deglazing the delicousness.
Stout and beef are good friends, and the chocolatey flavor of the stout would go perfectly with the cocoa nibs.  I also threw in a bit of balsamic for a little more sweetness and tang, and a bit of soy sauce to boost the umami.  Once I scraped up all the good bits from the pan, everything went into some foil together, and I pinched the foil shut to make a package for the beef to braise in.  Using a foil package is nice, because it keeps the meat nice and moist, and you don't need a lot of liquid to braise the meat in.  Into a 350F oven it went, along with some potatoes I wanted to roast (and then some asparagus a half an hour later) in a separate container.  An hour later I was rewarded with some tasty, tasty brisket.  I let it rest, then sliced it and put it back in the braising liquid to stay warm and soak up some more flavor.  I finished up the roasted veg and made a quick tomato and onion salad to go with.


And there you go.  Might I suggest you enjoy this with a hot flakey biscuit?

Mango: I can't remember what we talked about when we were cooking this.
Panda: Probably buttocks.

Chile and Cocoa Rubbed Braised Brisket

1lb brisket, preferably the fat end (another cut of meat will work for this as well)
Small handful cocoa nibs
Small handful ground chipotle chile
5 finger pinch of salt
About 1tbsp of peppercorns
1 cinnamon stick
3 cloves garlic
1tbsp balsamic vinegar
1tbsp soy sauce
Olive oil
1 large red onion, sliced
1c stout beer

Preheat your oven to 350F, and heat a cast iron pan (a regular frying pan will do if you don't have one) over medium heat.
  
Grind the cocoa nibs, peppercorns and cinnamon stick in a spice grinder until medium course (keep an eye on this, because the fat in the cocoa nibs may make them stick to the sides of the spice grinder).  Add this mixture to a mortar and pestal along with the garlic, salt, chipotle pepper, and a bit of olive oil.  Grind into a paste - if the paste is too thick add a bit more olive oil.  You want a consistency that will allow you to rub this all over the meat.

Open your meat up by slicing into the top 3rd of the meat and opening it like a book.  Then slice into the bottom 2/3 of the meat and open that towards the other side - this will give you one thin, wide piece of meat.  Rub the paste all over the meat, then roll the meat back up.  Optionally, you can tie the meat together using some cooking twine to help it hold its shape.

Add some olive oil to your pan.  Sear the meat on all sides until nicely browned, then remove.  Lower the heat to medium.  Add a bit more oil, then your sliced onion. Stir the onion around until the onion is brown and caramelized.  Deglaze your pan with the beer, balsamic and soy sauce - scrape with a wooden spoon to remove all the bits on the bottom of the pan.

Add the mixture from your pan along with your beef to a piece of aluminum foil (be sure to fold it up a bit before doing this so that it doesn't run out).  Bring the foil up around the meat and fold it shut to create a package.  Place this package in an oven proof baking dish (this is just in case there is a leak in the foil) and place the dish in the oven.  Braise for at least 1 hour, preferably 1.5.  Allow the meat to rest for at least 15 minutes, then slice and return to the baking dish along with the braising liquid.

Wednesday, April 18, 2012

Butter, biscuits, and brisket!


by Mango

Hello again! First off, butter is delicious (more on that in a moment). Second, biscuits (also delicious) can be pretty difficult to get right. Third, I have no idea how to make good braised brisket, so that is in Panda’s hands (paws?), and will be ready for you in our next blog. Since he made butter the other day, I figured nothing would go better with it than some warm scrumptious biscuits. The recipe I use belongs to Alton Brown, who is the best part of Food Network (I miss cable). Ina Garten runs a close second, if you ignore her hatred of cancer-stricken children. Giada De Laurentis (insert boob-parading and/or giant head comment here) is decent, when she isn’t annoying me with her over-pronunciation of Italian words. Rrrrrrrrrrrrrrrriiiccccooooootttttttaaa. Mozzzzarrrrrrrella. But I digress. Back to Alton’s Southern Biscuits recipe. Preheat your oven to 4500F. Here’s what you need for 12 biscuits:

·       2 cups flour (NOT BLEACHED. Bleached flour is gross.)
·       4 teaspoons baking powder
·       1/4 teaspoon baking soda
·       3/4 teaspoon salt
·       2 tablespoons butter (I’m going to use Panda’s homemade butter this time)
·       2 tablespoons shortening (I use half the amount, still turns out great)
·       1 cup chilled buttermilk (I’ll be using buttermilk left over from the butter-making)

Now, don’t be afraid of this recipe having both butter and shortening. Butter has been vilified by health nuts and some doctors too, but compared to other things out there (margarine and butter-like products such as Smart Balance and whatnot), it really is healthier. Shortening is not the best, but with baking, there really is no better substitute for getting the right balance of crumbliness and softness. And really, as long as you’re not inhaling a dozen biscuits every day, a little butter and shortening once in a while won’t kill you. So here we go! 

I usually halve the recipe when baking biscuits for just the two of us.  Mix all the dry ingredients in a bowl.


Then cut a tablespoon of chilled butter into pea-sized bits and add to the flour. Add half a tablespoon of shortening as well. Use your fingers to work the shortening and butter bits into the flour, such that the dry mixture starts to look crumbly.


Make a little well in the center and add the chilled buttermilk. I use a fork to bring everything together. Do not overmix or you will end up with hard yucky biscuits.


When the ingredients have just started to come together, transfer it to a clean surface. Gently fold the dough over itself two or three times.  Do not knead (hard and yucky!). You will see bits of butter and shortening in it. This is good. Your dough may look like a big undermixed mess. This is also good.


Use a rolling pin to gently flatten the dough until it is about an inch think. Cut into biscuit shapes. I don’t have a cutter, but I’ve found that using a floured glass jam jar works perfectly fine!


Place in a lightly buttered cake pan, and bake at 450F for about 12 minutes, until the biscuit tops start to look golden brown.


Slather on your spread of choice and enjoy!


Panda: I could eat 80 of these.
Mango: No, you can't. I advised against this on the blog.
Panda: *grumble*


Tuesday, April 17, 2012

Cultured Butter

by Panda

Cultured butter.  Hmm, yes.  Pish posh.  Crumpets and such.

After reading a blog post by Michael Rhulman about cultured butter, I decided that this would be a great thing to try making.  The process for making butter is actually very simple. In fact, it's simpler than making whipped cream.  Why?  Because when you make whipped cream, you need to stop whipping the cream when it reaches the right consistency.  If you whip it too long, you actually end up with butter.

So, why cultured butter?  The taste.  While butter itself is delicious, cultured butter is simply in another league.  It's flavor is more complex and satisfying than its uncultured counterpart. The process for making cultured butter involves an extra step, which is to culture the cream.  This involves adding a friendly bacteria to the cream, much like the process for making yogurt.  Typically you would want to use cultured buttermilk as your starter, but, since we didn't have any, I decided to use some Greek yogurt we had on hand instead.

Simply pour your cream into a container with an air-tight lid.  Add a few tbsp of your starter (yogurt, keffir, buttermilk - whatever you happen to have), and stash this in a warm (not hot) place for 12-24 hours.  My particular culture took about a day and a half to set up; it may take more or less time, depending on the temperature.  Heating the cream to 110F first would probably speed the process up.

Cream culture after ~36 hours.
You'll notice that the mixture is pretty thick when it's ready.  It's best to cool this mixture for around an hour in the fridge before whipping; cold cream whips much easier than warm cream.  Attempting to make butter with warm cream would still work, but it would take a while.  Less time for eating is never a good thing.

Once the mixture is cooled, connect your paddle attachment to your mixer and mix away at around medium speed.  The mixture should start to thicken slightly (like you're making whipped cream).  Eventually, you will notice chunks starting to form.  The point at which it changes from cream to butter happens pretty quickly; change the speed on your mixer if you notice buttermilk starting to slosh out of the bowl.

Whip it.  Whip it good.  When some cream comes along, you must whip it. 
Buttermilk and butter.
Once your mixture has changed into butter, line a colander with some cheese cloth or a clean kitchen towel, and then set that inside of a large bowl.  Pour the buttermilk + butter mixture into your colander.  I found that wrapping the cloth around the butter and ringing the buttermilk out of it worked very well.  Save the buttermilk!  It can be used for baking!

The last step is to rinse your butter.  This is a fairly important step; any buttermilk left over in the butter will cause the butter to go bad much faster.  I found that the easiest way to do this was to simply dump the butter into a bowl of cold water and knead it around; change the water a few times if you notice that the water is still cloudy.  Remove your butter and drain off any excess water.

Ringing out the buttermilk.
Boosh.  Butta.


You're done!  Pack your butter into some air tight containers.  At this stage we decided to separate it into two batches - one with salt, and one without.  The salted batch will be used for buttering bread and biscuits, and the unsalted batch will be used by Mango for baking.

Mango: You made butter.
Panda: Yes.
Mango: BUTTER.
Panda: Yes.
Mango: Let's quit our jobs and pay our bills in bread and butter.
Panda: Okay.