Search This Blog

Monday, July 8, 2013

Adventures in Stupidity 1: Trinidad Scorpion Pepper Mixed Nuts


Product of Canada?  Really?
by Panda

Mango and I stopped by Buford Farmer's Market one day to pick up some groceries for the week.  As we walked through the produce section my gaze fell upon the little plastic container above.  Mango and I both gave each other a look, I shrugged, and I threw it into the basket.  Common sense would not prevail this day.

Cute huh?
The Trinidad Scorpion pepper is currently the world's hottest pepper, recently ousting the Bhut Jolokia (ghost pepper) as the world's hottest pepper.  The heat of chile peppers is rated using the Scoville Scale.  The Scoville Scale was originally based on the number of squirts of a water + sugar mixture needed to completely cool the mouth after eating a particular chile; nowadays, however, they use liquid chromatography to determine the capsaicin content of each type of chile, since a sugar liquid test was both subjective and impractical with hotter chiles.  A bell pepper has a rating of 0 on the Scoville Scale since it has no heat whatsoever.  Jalapenos have a rating of around 5000.  Habaneros have a rating of 300,000.  Ghost chiles come in at around 1,000,000.  The Trinidad Scorpion have a Scoville rating of 1.5 million, or the equivalent of 300 jalapenos.  If you're bored and enjoy the suffering of others you can find plenty of videos of people eating these things on YouTube.

I had to try a bit of one just to see what I was dealing with.  Yep.  They're spicy alright.

A Word on Chile Pepper Safety

Needless to say, you need to be careful with these things, or any of the really hot chile peppers.  I highly suggest working with rubber gloves when dealing with extremely hot chiles.  Even for something like serranos, which are "only" 10,000 - 25,000 on the Scoville scale, you really ought to use gloves.  This is not a matter of being a whimp - it's a matter of not getting capsaicin on your hands and then transferring it to your eyes* later on.

*Or, y'know... "down there".  Which I did once when I forgot to wash my hands before using the little panda's room.  Lesson learned.

Make sure you keep things very clean.  Wash everything off after you use it, and try to avoid touching things with your bare skin before you wash them.  I'd also suggest using a cutting board on top of your regular one that you don't mind getting chile juices on (this keeps you from getting capsaicin on your cutting board, which in turn can get on other foods you'll chop on it).  Also make sure you do this in a well ventilated room, as the fumes that are produced from extremely hot chiles can sometimes sting your nose/eyes a little; open a window if you can.

If the idea of using chile peppers that can be weaponized kind of freaks you out, or you're just not stupid into hot chiles like I am, feel free to use milder chiles in any of the recipes I'll be posting for the Trinidad Scorpions.  Jalapenos or serranos will provide a nice tingle and chile flavor without all the heat.  Also feel free to mix up your chiles for a variety of flavor and taste combinations.

In short - just use common sense and be careful.

On to the Nuts

Not too many seeds in this one
I often roast up mixed nuts to snack on using different spice blends.  It lets me control what fats go into the nuts, as well as the level of salt and other seasonings that go into them.

When putting a "wet" ingredient like a chile pepper into a dish like this, you want to make sure you get an even distribution, otherwise someone will eat a big chunk of pepper and blow their head off.  The best way I've found is to turn the ingredients into a paste, and then cook that paste in the oil you're going to coat the nuts with.


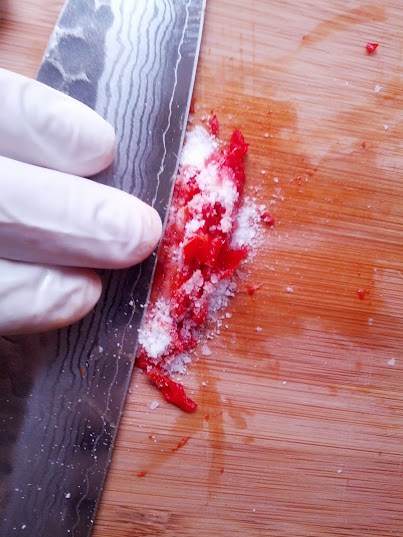
Simply mince your chile up on your cutting board, sprinkle on a good pinch of kosher salt, then use the flat side of your knife to grind the chile against your board.  This will turn it into a paste.  The same thing can be used with garlic (and garlic would be a mighty fine addition if you wanted to throw some of that in, too).


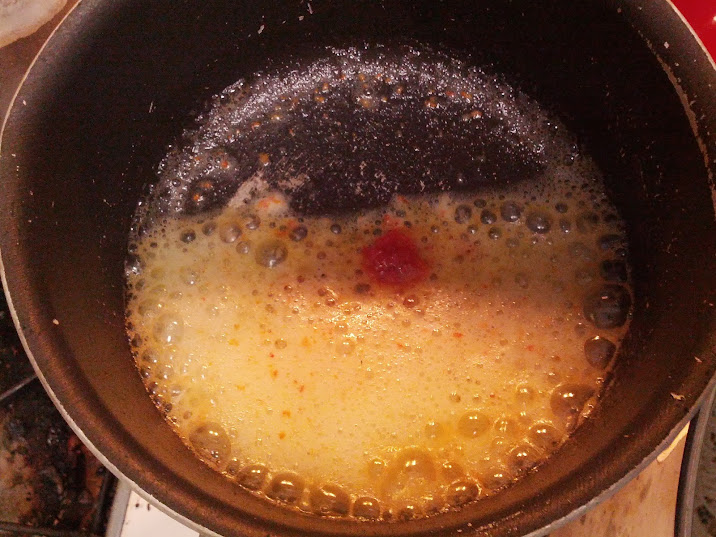
Put your oil(s) in a pan over medium heat and toss in your crushed chile.  Stir it up a bit and let it cook.  Keep your face pointed away from it if the fumes bothers you.  You're done when it stops foaming.


Pour the infused oil over your mixed nuts and toss to coat evenly.  I used cashews and almonds, but most any nut will do.  Just be sure to use raw (unroasted) nuts because we're going to be roasting these in the oven.


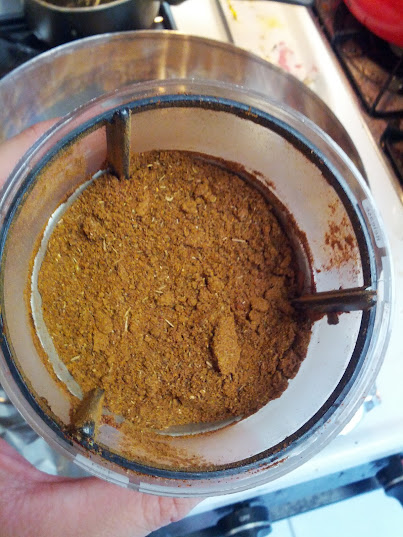
Put together your spice blend (recipe below) and buzz it up in your spice grinder or grind it up with your mortar and pestal.  Then sprinkle this over your nuts and toss to combine.

NOTE: It is actually pretty important to pulverize everything, especially the salt.  If the salt or anything else is too "chunky" (the grains are too big) it won't stick to the nuts.  It has to be pretty fine.


How much of the spice mixture you use entirely depends on how much you want.  Sprinkle on about a quarter of your mixture, taste a nut, then adjust from there.   Then just pop them in the oven and cook until fragrant!

The end product is actually not that spicy.  Spicy for sure, but not spicy enough to incapacitate you.  I brought them with me to a July 4th party and, while everyone did acknowledge that they were pretty spicy, they appeared to be a big hit.

I hope you enjoy putting my nuts in your mouth*.

* I had to work one of those jokes in somewhere.  I know, I'm 12.


Trinidad Scorpion Mixed Nuts

2lb unsalted mixed raw nuts (almond, cashews, walnuts, etc)
1/2tbsp coconut oil or butter
1/2tbsp olive oil
1 fresh Trinidad Scorpion pepper, or any other combination of chile peppers your like
Spice blend (to taste):

  • 1 part whole pepper corns
  • 1 part herbs de provence, rosemary, or any other dried herb you like
  • 1 part chili powder
  • 1 part kosher salt
Preheat oven to 300F.  Put mixed nuts in a large bowl and set aside.  Line a sheet pan with aluminum foil.

Mince the chile pepper, then crush using kosher salt and the flat side of your knife until you've made a paste. Add the oils to a small pot and place over medium low heat.  Add the chile paste to the oil and stir to combine.  Cook until the mixture no longer foams.  Pour the chile infused oil over the mixed nuts and stir to combine.  Add the spice blend incredients to a spice grinder and grind until fine.  Sprinkle spice mixture over the nuts, stirring to combine and tasting until you're happy with how they taste.

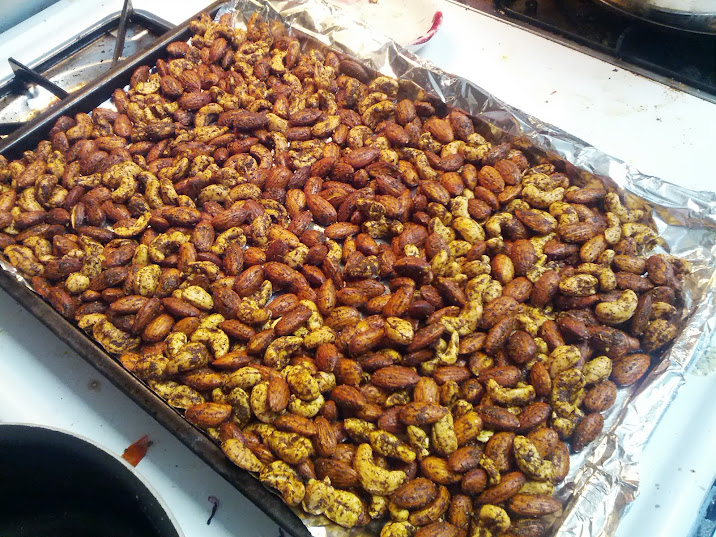
Pour the nuts onto the sheet pan, spread out evenly, then roast in the oven until fragrant, about 10-15 minutes.  Remove from the oven and a allow the nuts to cool thoroughly before putting them in a container.


Panda: Trinidad Scorpion pepper mixed nuts are in the oven.  Please say a prayer for my gastrointestinal tract.
Mango: *bringing home gas masks and gloves from work*

Sunday, June 2, 2013

Chicken Stock for the Soul


By Mango

Today was a quiet, lazy Sunday. It was also clean-out-the-overflowing-what-in-the-world-is-in-here freezer day. We routinely save chicken bones, either from raw chicken that Panda cuts up, or from roast chickens that have been cooked whole. We also hang on to every and any veggie and mushroom bits left over from cooking preps, and everything goes into the freezer to make either chicken or veggie stock. The great thing about stock is that there is no fixed recipe, and it will taste just a little bit different every time. Home made chicken stock is so versatile, and can be used for soups, gravy, sauces, even for cooking rice. This time, I used our stock to make a simple chicken noodle soup.

For the chicken stock, this is basically what I started out with:

The chicken bones (backbones, leg bones, wing bits etc) are at the bottom of the stock pot.

The veggies this time around included leeks, cabbage leaves, fennel tops, carrot tops, asparagus ends, radish pods (hard to find, but we lucked out and had these left over) a large onion chopped in half, a whole garlic bulb sliced in half, and a bunch of fresh thyme.   You can throw in any herbs and veggies that you like. It doesn't matter if the onion and garlic peels/skins are still on. This will all be strained out later anyway.

Fill the stock pot with water and bring to a boil. Then lower the flame and simmer for 4 to 6 hours, with the lid on.

I simmered this batch of stock for 5 hours. This is what it looked like when done:

Isn't the color so beautiful?! 
The next step is to strain it.

The chicken parts and veggies are mush by now, and will taste like nothing. Throw this away. They have served their delicious purpose.

And here is the stock. Golden brown and rich in chicken and veggie flavors that have had 5 hours to mingle. 

Cool the stock and portion into pint sized containers. We usually keep this in the fridge overnight. The chicken fat floats to the top and solidifies, forming a distinct layer that can be scooped off and discarded, or saved separately for other cooking uses (Panda says it is called "schmaltz"). The containers are then put in the freezer, and can be stored for several months.

Panda: To cool the stock quickly, just do the following.  Put a stopper in the drain of your sink.  Set your pot in the sink and surround it with ice (the more the better).  Then fill the sink with water so that the pot is surrounded with water and ice.  The icy water will cool the pot down quickly.  The faster the stock cools down the better!

And there you have it, chicken stock! We got about 5 pints out of this batch. 3 are shown above. I used 2 pints to make chicken noodle soup.

Ingredients:
1 medium onion, chopped
2 garlic cloves, chopped
1 peeled carrot, chopped
1 celery stalk, chopped (including celery leaves)
Half a tomato, chopped
2 bay leaves
1 1/2 teaspoon dried herbes de provence (you can use whatever herbs you like)
1 teaspoon fennel seeds
2 teaspoons Dijon mustard
a handful of chopped flat leaf parsley
a dash of nutmeg
Salt and pepper to taste
Olive oil
Egg noodles
Left over chicken breast, chopped (any chicken meat will do. We had leftover roast chicken breast.)

Sautée the onions, carrots, and celery in olive oil until softened. Season with salt and pepper. Add the tomato and garlic, cook for a couple of minutes. Add fennel seeds, herbes de provence, nutmeg, and bay leaves (cloves would be really good in this too). Cook for another 2-3 minutes, add 2 pints of chicken stock, chopped parlsey, and the Dijon mustard. Bring to a boil, them simmer for about a half hour. Add the egg noodles, cook for about 5-10 minutes or until done. Throw in chopped chicken breast, simmer for 5 minutes and then turn off the heat. Let the chicken soup sit for 30 minutes to an hour so that all the flavors can come together. The soup will taste even better the next day.


Wednesday, May 1, 2013

Spring Has Sprung: Ramp Pesto


By Panda

Spring is here, and with Spring comes spring veggies!  Peas, asparagus, artichokes, and... uh... whatever these are...

No, not the bananas.  I'm talking about the things with the green tops and purple-white bulbs.  They're ramps, and they're usually available between April and late June, depending on where you are.  They can be difficult to find, again, depending on where you are, and can be pricey, but if you can manage to find some they are well worth it.

They're also known as wild leeks, wild ramps, ramson, wood leek, and a few other names.  Why so many names? This is because they taste like a mix of every member of the allium family put together.  It's like the result of a spring onion, a leek and a garlic clove getting freaky together, except no one's sure who the mom is, and every one of them tests positive on the paternity test.

These little guys are pretty popular in restaurants and with chefs in the know, partly due to their scarcity, but also due to their great flavor.  They are absolutely fantastic grilled, but I decided on another use for them this day.


So one thing you need to do is to make sure you wash these well.  If you do find ramps, chances are they've been foraged and that they're probably pretty dirty.  Just rinse them under some cold water to knock the dirt off, and peel away any loose/slimy skin on the outside if there is any.


For the pesto you'll want to use the green leafy parts (cut the roots off of the bulbs and save the bulbs for another use, which I will get into in another blog post).  In addition to that you'll want about 2/3 as much sweet basil and 1/3 as much parsley by volume.  There's no need to sweat exact measurements here - just eyeball it and go with handfuls.


Add to that a good handful of pistachios, some lemon juice, a good pinch of salt, about 10 grinds of pepper, and a nice sized chunk of parmesan cheese (half a handful?) cut into small chunks.  Pour in a bit of extra virgin olive oil and get your food processor going.  Pop the top on and drizzle in your olive oil until you hit the right consistency: it should be the thickness of a loose paste.  Check it for seasoning and add additional salt and pepper if it needs it.  Ta-da, you will be rewarded with this!

Glorious! 
When you're done you'll have a beautiful bright green pesto that tastes of garlic and onions.  Ramps can be quite strong, but the basil and parsley do a wonderful job of toning it down just enough.

So what can you do with this stuff?  Well, there's the obvious:


Mango roasted up some chicken and made some fresh pasta for us, and when the pasta was done I tossed it with a good sized spoonful of the ramp pesto and a tiny bit of the pasta water.  No need to cook the pesto - the heat of the pasta was enough.  Some chopped pistachios mixed in would have been a great textural addition.  A little chile flake would be very nice also.

Here's another idea:


Goat cheese, ramp pesto and pistachios on toasted Italian bread, or what I like to call "garlic bread on steroids."  Be prepared to make grunty noises when eating these.

Other things you can do:
  • Toss the pesto with new potatoes and roast them
  • Mix the pesto with mayo and use it to make chicken, pasta or egg salad
  • Mix the pesto with red wine vinegar or lemon juice to make a dressing or dipping sauce
  • Spoon it into your mouth... don't worry, no one's judging you
If you have any left over you can put it into ice cube trays and freeze it.  Otherwise you'll want to use it within a week or so.

Mango: They cost how much?
Panda: Trust me, they're worth it!
Mango: But -
Panda: Trust me.

Later on...

Mango: *tasting the pesto* SO WORTH IT.

Ramp Pesto

1 large handful of ramp tops (green parts only)
2/3 as much sweet basil
1/3 as much parsley (Italian or curly)
Large chunk of parmesan cheese (half a handful or so) cut into small chunks
1 handful of pistachios
Juice of 1/2 lemon (throw in the zest if you want, too)
Large 3 finger pinch of salt
10 grinds of black pepper
Extra virgin olive oil

Add all of the ingredients to your food processor with just a splash of olive oil at first (this helps to get things going).  Put the top on your food processor and turn it on.  Drizzle additional olive oil into the feed tube as it runs until it reaches the desired consistency (a loose paste).  Check for seasoning, add additional salt and pepper if needed and blend briefly to incorporate.

What if I can't find ramps?  What if they're too expensive?

These would be an unfortunate but completely understandable situations to find yourself in.  If you still want to make a pesto that's similar, substitute a large handful of chives or a bunch of green onion tops along with a large clove of garlic for the ramp tops.  It won't be quite the same, but it'll be reasonably close.  Another option is to buy a few ramps and use those along with some other allium - in this case I'd go with leeks and garlic since the ramps themselves will still be quite strong.


Tuesday, April 30, 2013

The food of my people: TACOS!!

Slow cooked pork tacos with fresh salsa and avocado

By Mango


People here sometimes mistake me for being Mexican or Hispanic. And not just any people. Mexicans and other Hispanics think I'm one of them. My Indian peeps, however, and most others, see me for what I am. A strange Indian person. Panda and I often joke that whenever we crave the food of my people, we go to our favorite taco place down the street. This would usually be the greeting from my always friendly Hispanic neighbors:

To Mango: Hola!!
To Panda, after pensive pause: H-E-L-L-O

So yesterday, I had the urge to make a crockpot dish, which is the best thing ever during the week, because you can make a big batch of food and you're set for a couple of days, if not longer. We had a giant pork chop in the freezer, a little smaller than the diameter of a dinner plate, and about 2 inches thick (Panda guestimates that it was about 2 pounds in weight). We also had one bunch of collard greens. Pork + collard greens = two things that are amazing when slow cooked. Perfect.

I apologize in advance, because this blog post doesn't have too many pictures except for the star of the dish - pork. I didn't plan on writing a blog but it turned out so delicious, that Panda said "FOR THE LOVE OF ALL THINGS HOLY, WRITE A BLOG ABOUT THIS". Okay, not that dramatic, but close. The recipe I used is adapted from a "slow cooker Mexican pulled pork" recipe that I found online. I used their spice blend, but added the collards, a couple of other spices, and tweaked the quantities. This is what I used for the pork:

1 Tbsp chili powder (the type used to make American chili. Not the chile powder typically used in Indian dishes.)
1/4 Tbsp kosher salt
1/4 Tbsp brown sugar
1/2 Tsp ground cumin
1/2 Tsp cayenne
1/2 Tsp smoked paprika
1 Tsp dried, crushed oregano
1/2 Tsp freshly ground pepper
A pinch of cinnamon

Note that any cut of pork will work so long as it has some fat to it - we just used a pork chop because we had it on hand.

Mix all of the above together in a bowl. Then rub and pat down the pork chop (make sure it is fairly dry first, use a paper towel to wipe off excess moisture) with a generous amount of this spice mix. You will end up with this:


Let the pork sit for at least an hour in the fridge or at a cool temperature. You will likely have some spice rub left over. Save this. In the mean time, slice a large yellow onion, smash 3 cloves of garlic, and wash and chop the collard greens. Also set aside 5 cloves.

After about an hour in the fridge, let the pork sit at room temperature for about 15 minutes. I honestly don't know if this matters much, given that it will slow cook overnight, but I did it anyway. Heat a couple tablespoons of olive oil in a skillet. Bring to high heat. Sear the pork on each side for about a minute, until you can smell the spices and see a nice brown on the seared pork. Once seared evenly, remove and place in the crockpot.

Add the sliced onions, collards, garlic, and a crumbled cube of chicken bouillon to the same pan that you just seared the pork in. Saute for about 5 minutes with the remaining spice rub. Add a tablespoon of apple cider vinegar and use this to deglaze any pork and spice bits and mix it all in with the onions, collards, and garlic. Transfer all of this to the crockpot. Throw in the 5 cloves, and add enough water to just barely cover the pork. Set the crockpot on low, and let it go overnight. The next morning, you will wake up to this:

LOOK.

LOOK AT IT.
The meat will fall apart easily with just a gentle tease of the fork. We had chunks of the pork on corn tortillas, topped with a simple tomato-red onion-thai chiles-cilantro salsa for a burst of freshness, and some sliced avocado for a little creaminess. The pork was magical. Melt-in-your-mouth, smokey, and a deep, gradual surge of warm flavor that can only come from low and slow cooking. I'm definitely saving this recipe and will use it again.

Panda: You do realize that this is just going to further convince people that you're really Mexican.
Mango: Si.  Uh, I mean, yes.
Panda: ......

Sunday, April 21, 2013

Mmm Burgers: The General Muir


by Panda

The General Muir, a Jewish deli, opened at Emory Point not long ago, and I heard that they were serving a great burger.  Todd Ginsberg, chef at the General Muir, used to run the kitchen at Bocado.  Bocado is very well known for their double stack, and so it only makes sense that Chef Ginsberg would want to have a burger at his new establishment as well.  While the two burgers are very similar, the burger at the General Muir has few tweaks that make it a different experience.


Inside the General Muir.
My friend Justin and I were here for the burger, but the fact that we were sitting in a Jewish deli was not lost on me.  I love Jewish delis - the bagels, the pastrami, the "shmears" - but in particular I love the pickles.


I thought that the pickles might have all been pickled the same way, but boy was I wrong.  Each pickle had a very unique character to it.  The first one we tried, the big dill pickle in the middle, was fermentation pickled, and it was a great example of your standard pickle done remarkably well.  The green tomatoes were unexpectedly sweet and spiced with clove.  The carrot pickles were sweet, sour and spicy.  The cauliflower had a bit of curry flavor to them.  The radish pickles were refreshing and a bit tart, and I could taste some anise in the cabbage.  You have to try these, especially if you like pickles.

And now on to the main event:


Knowing how good the Bocado burger is, I was expecting this burger to be great as well, and I was not disappointed.  The burger patties had a great crust on them from being seared on the flat top, and the cheese and pickles were great.  The "tweaks" I mentioned earlier come in the form of special sauce *cough*thousandislanddressing*cough* and a Holeman and Finch onion roll.  I have a soft spot in my heart for Big Macs, having eaten many of them as a kid, and this burger was like a Big Mac that had been elevated to a grander, loftier place.  The fries were also great, as I expected them to be - every bit as good as Bocado's.  Maybe a bit crisper in fact?


We finished the meal off with some dessert.  Justin opted for the rice pudding, which was bruleed with sugar.  Very good and highly recommended.


Again, being in a Jewish deli, I felt compelled to get something Jewish for dessert:


Behold the noodle kugel.  If you're not familiar with this dessert, the best way I can describe it is that it's like rice pudding made with noodles.  This was quite tasty, although the top was not as crunchy as I was hoping it would be - but that happens when something's been sitting in the fridge.  I think something like this would be fantastic if served warm and crisped up on the top a bit.  There were chunks of cinnamon laced sugar throughout the kugel, which was quite tasty.

I will be making a trip back here to try their other delicacies, although it'll be hard to keep away from the burger on my return trip.

Panda: *after leaving* I have stuffs for you!
Mango: :)

Monday, April 8, 2013

We're making fish sticks!!


By Mango 

WE CAVED *lowers head in shame*. Processed food made it into our bellies. BUT IT'S FISH STICKS!! When I was little, I went through a too-long-to-correctly-estimate phase, where my dinner every night had to be a fried egg (sunny side up, of course), with 2 fish sticks, and a dollop of ketchup. My mom would make sure some veggies made it in me (beets, to be exact, which still makes me barf. Blog for another time, perhaps), but I had to have those fish sticks. Panda also fondly remembers his fish stick binges as a child. Which also would have happened today, if I hadn't eaten my way through a pile of them first. 

So, before we share our grand recipe with you, what exactly is in a fish stick?

Evil fish stick ingredients.
Let's focus on those last 2 "ingredients", shall we? Sodium tripolyphosphate, according to the Googles, has applications in both detergents and food products. So, what you use to clean your underpants is quite possibly what you're eating. And TBHQ, in addition to food preservation applications, is also added to varnishes, lacquers, and the like. Both compounds are GRAS, or "generally recognized as safe", by the FDA. That's right. Generally. So yeah, we just ate that. AND IT WAS DELICIOUS.

Instructions:

1. Heat oven to 425 degrees Fahrenheit.
2. Remove fish sticks from bag. 
3. Place on tray. 
4. Place in pre-heated oven. 
5. Bake for 19 minutes.

Panda: I feel no shame in eating fish sticks.  It felt good, and it tasted good, and I would do it again.  I made a home made tartar sauce to go with it, so we did make something at least:


Bread and butter pickle chips, about 5 or 6
1 dill pickle spear (or 4-5 baby dill pickles as above)
1/4 red bell pepper
1/4 red onion (use shallot if you feel like being fancy)
1 heaping tbsp capers
1/2tbsp lemon juice
1/2tbsp bread and butter pickle brine
1c oil (use a neutral flavored oil, or olive oil if you like the flavor)
1 egg yolk
1tsp sugar
1tsp dry dill
Salt and pepper
A few healthy dashes of your favorite hot sauce

Mince the first 5 ingredients together.  Add sugar, salt, pepper, dill and hot sauce, mix together and set aside.  Add the lemon juice, brine, oil and egg yolk to a container (preferably something tall and not too wide).  Blend together with a stick blender until everything emulsifies (congratulations, you just made mayonnaise!)  Fold in the other ingredients, adjust seasoning to taste.  Stash this in the fridge to let it chill.

We also had a fresh salad with it. It was a really delicious dinner. Not one that we will have again (maybe in another decade), but it brought back happy memories. And everyone deserves a little cheat meal.  

Mango: Can I have more?
Panda: Sure.
Panda: *Comes back with a bouquet of fish sticks* For you my love.


Thursday, January 10, 2013

Spanish Cornish Hen & Rice

by Mango

Spanish Cornish Hen with Jasmine Rice

New year, new recipe! I had never made this dish before and from what I've seen, it typically involves chicken. We didn't have chicken, but we did have a small Cornish hen in the freezer that we were supposed to cook during Christmas but didn't, so I figured I'd use it here. It's a perfect little size, and this recipe makes enough for two people, with enough left over for one person the next day (so flip a coin, or fight to the death). 

There are many variations of this recipe, but these are the ingredients that I used:


*1 cornish hen, cut into portions (not pictured above)
*Half a large onion, chopped
*Half a large green pepper, chopped
*Poblano pepper, fire-roasted, peeled, and chopped
*2 medium tomatoes, chopped
*1/2 cup tomato puree (not pictured above. I'm useless.)
*4 cloves of garlic
*hot red pepper flakes, 1-2 tsp (optional)
*3/4 tsp smoked paprika
*1 pinch saffron strands (the 2 finger pinch, not all 5 fingers)

This is to scale. I used the amount remaining in the little box.
*Preserved lemon, 1 quarter
*2-3 dried bay leaves
*1/2-1 tbs rice wine vinegar (not pictured. Dammit!!!)
*salt and pepper to taste
*1 Maggi chicken bouillon cube (my mom would be so proud!)
*1.5 cups jasmine rice
*Water, 2-2.5 cups (if you have chicken stock,use that instead, and nix the maggi cube)
*Olive oil and 1 tbs butter

The first thing to do is to cut up the Cornish hen into portions.

Mango: What term can I use to describe cutting chicken or poultry into pieces? Portioning? Chopping?
Panda: Portioning.
Mango: Okay.
Panda: Ihatechickens-ing.
Mango: Okay.
Panda: Chickensmustdie-ing.
Mango: I get it. Thanks.

I actually did the portioning part myself! I watched and learned from Panda every time he would delicately take apart poultry, and I was quite proud of myself for not having butchered the poor little hen. Poor little hen. Like it isn't already dead. But still, I treated it well, like we try to do with all our food. Any leftover bones have been placed in a freezer bag for stock-making at a later date. We try our best to use every part of whatever we've purchased to cook. Be good to your food! 

Okay, so the hen has been cut. Season with salt and pepper. 

Heat up a generous amount of olive oil and a tablespoon of butter in a dutch oven pot, and brown the 
Cornish hen portions on high heat.

Remove and set aside. Juices may start to drain from the Cornish hen but do not discard! All of it will go back into the pot later.

Lower the heat to medium and add the chopped onion, green pepper, poblano pepper, chopped garlic, hot red pepper flakes (optional) and bay leaves. Season with a little pinch of salt and pepper. Stir fry until the green pepper softens and onions become translucent.

Add the smoked paprika. Stir fry for a couple more minutes. Then add about a half tablespoon of rice wine vinegar and used this to deglaze. You can of course use white wine (and if you do, you can use way more than half a tablespoon), but I didn't have any handy. Note that vinegar is not an equal substitute for white wine. I used it here because, well, I just wanted to, okay? [Side note: Have you ever noticed how Rachel Ray sometimes suggests the most nonsensical food substitutes? "If you don't have chicken stock, go ahead and use a little orange juice instead!", or "No milk? Try EVOO! Use what you have, I always say!". I'm not a chef and I don't know nuthin 'bout nuthin, but I'm almost sure that OJ doesn't taste like chicken. But I could be wrong. I do like her though, she always seems happy.]
After deglazing, add the chopped tomatoes and chicken bouillon cube. I think this is when I also added the saffron. Stir fry for a couple of minutes until tomatoes soften.
Then add the preserved lemon.......

......but only the rind and not the pulp. 
These are Meyer lemon preserves (macerated in salt and spices) that Panda had made months ago from a bunch of lemons given to him by friends who have a Meyer lemon tree. Preserved lemons are really fantastic in a number of cuisines - Spanish, Latin American, Mediterranean, Middle Eastern - to name a few. 

Panda: I used Jamie Oliver's preserved lemon recipe for these.  They're super simple to make, and a jar of them will last you a long time.  Make sure you use organic lemons (or lemons from your friend's tree).

Once you add the preserved lemon quarter, it will incorporate amongst the tomatoes, peppers and onions, making everything just a little tart, tangy, and delicious. If you don't have preserved lemon, you can throw in a couple slices of fresh lemon or lime. 


Add the tomato puree, stir everything together and cook for about 5 minutes. 


Add the browned Cornish hen and any juices back to the pot. Coat the hen portions in the sauce, add about a cup of water (or enough to just barely cover the hen pieces), plop the lid on, and cook on medium heat for 10 minutes. 


Add the rice, and about a half cup of water. Mix everything together. Bring to a boil, then turn the heat down to low and put the lid back on.

Let the rice hang out with the Cornish hen for about 30 minutes, or until the rice is cooked and fluffy. I totally sucked at this part. I kept underestimating how much water was needed and how long the rice would take to cook, so I had to keep peeking and adding more water as needed until the rice was done. Unable to get rice right. Someone take away my Indian card. 

But eventually, it worked out. Rice is done!

Just a little bit tangy, with subtle smokiness from the paprika and poblano, sweetness from the tomatoes and bell pepper, and a touch of color from the saffron. Altogether, very tasty.
I hope you try it and enjoy it too! This recipe is pretty forgiving, so you can play around with it as you wish. If you don't have Cornish hen, you can of course use chicken. Or sea cucumber! (Do not use sea cucumber.)